Camera Restoration


First roll off my Olympus 35 RC. I finally got around to changing the seals on this old mechanical beauty – the Olympus 35 RC was one of the last mechanical Rangefinders that Olympus made. The RC has an Auto mode – it’s a shutter priority system. You set the shutter speed, and when the camera is on Auto, it will set the Aperture. I prefer using the Sunny 16 rule, and was glad that the RC offered a manual override that allows me to set the aperture as well.

I was very curious about this particular camera – it’s very similar to my Ricoh 500G, and I had been looking for an Olympus rangefinder for a long time. The camera is a joy to use.. the operation feels smooth and precise, and feels comfortable in the hand. The Olympus RC details are in the in the Olympus Cameras page along with a description.

All of these pictures were taken near my brother-in-law’s house in North Potomac, and in the grounds of the park adjoining the neighboring Dufief School. As can be seen, the lens on the Olympus RC is outstanding. I love the way it renders the Fall colors. These old cameras had single coated lenses, and that did something magical for the color and bokeh given the right lighting. This is something that I feel the new multi-coated glass/optical plastic lenses cannot replicate. But again, maybe it’s just my imagination.


Olympus 35 RC
Olympus 35 RC
Olympus 35 RC
Olympus 35 RC
Olympus 35 RC
Olympus 35 RC
Olympus 35 RC
Olympus 35 RC
Olympus 35 RC
Olympus 35 RC
Olympus 35 RC
Olympus 35 RC
Olympus 35 RC
Olympus 35 RC
Olympus 35 RC
Olympus 35 RC

Olympus 35 RC
Olympus 35 RC
Olympus 35 RC
Olympus 35 RC
Olympus 35 RC
Olympus 35 RC
Olympus 35 RC

Photographed with an Olympus 35 RC rangefinder camera, Fuji Super 200. Exposure was 1/250 at f/8 and f/11


text and images © 2007 ajoy muralidhar. all names, websites, brands and technical data referenced are the copyright or trademark of their respective owners.
Add to Technorati Favorites

I found this little camera on eBay a few months ago, and just got around to running a roll through it. It was in generally good condition, even had a tiny 22.5mm UV filter on the Zuiko 28mm f/3.5 lens. The reason I took so long to clean up this camera was the light seals – the Pen EE has a slide-off back cover, not hinged like a traditional camera – so there is a very substantial seal required on the inside of the bottom cover. My curiosity about the camera finally made me give in and get the seals done.

Yoshihisa Maitani designed the Pen EE. Maitani gained fame as the designer of the exquisite Pen F interchangeable lens cameras and the legendary Olympus OM series cameras. The Pen camera dates back to 1959, but the Pen EE is from 1961. Olympus went on to make many more versions of the ‘automatic’ Pen EE cameras all the way into the 1980’s.

There were 2 versions of the first Pen EE, I have the older version with “Olympus” across the front, instead of “Olympus PEN”. The original version also has the leatherette cover instead of the ‘basket weave’ covering of the later model. One more difference – the older Pen EE has a 1/60 second shutter speed while the later basket view Pen EE has 2 shutter speeds – 1/250 for the Auto mode and 1/30 for the Flash setting.

The Pen EE is a Half Frame camera – that means 2 images for each frame of 35mm film. The 35mm format is 24x36mm, so half frame is 24x18mm in vertical format. It’s a small image, but the 28mm Zuiko lens is sharp enough to enable nice quality prints up to 8 x10 inches if used with a tripod, and 5×7 inch prints easily when hand-held. The film ISO range only extends to 200 ASA. The 28mm f/3.5 lens provides great depth of field, so it’s a point and shoot camera.

A fixed 1/60th second shutter speed on my Pen EE. That’s it. It’s the same if you set it on Auto or Flash on the original Pen EE. In the Auto mode, the selenium cell light meter sets the aperture automatically, while if you use the Flash mode, you can set the aperture from f/3.5 to f/22, but still at 1/60 second. That’s tricky.

I wanted to use the Sunny 16 rule with the camera, but the slowest print film available to me is ISO 100. Now the Sunny 16 rules says that for film speed for 100 ISO, the shutter speed will be 1/125 second at f/16 in bright sunny conditions. With the fixed shutter speed of 1/60, I would end up with pictures on the overexposed side by one stop. To compensate I would have to close down the shutter by another stop to f/22 to get an equivalent exposure.

The alternative is to set to f/16 and deal with the overexposure later with digital correction (by increasing shadow). In most cases, this will be fine, since the film has enough latitude to handle some overexposure and still produce a decent image. However, since the best color reproduction usually requires a slight under-exposure, it may still be a little too much.

This also means that to use the Pen EE in manual mode with Sunny f/16, we are limited to 100 speed film or lower. 200 ASA film would overexpose by 2 stops, and while film has a great deal of latitude, that much over-exposure would be difficult to correct. Of course, in shade or in cloudy conditions, the aperture range is more than adequate.

In my case, I tend to overexpose an additional stop in cloudy over cast conditions – instead of closing down the aperture, I was actually opening it up from sheer force of habit because of conditioning with my Ricoh 500G and Olympus OM cameras. Now that I’ve a chance to examine the results, I would say f22 for Sunny conditions, f/16 for slight overcast, and f/11 for shade (f/8 and f/5.6 only if you are really unsure.)

As far as the film development goes, any photo processing lab can handle it since it’s just regular 35mm film processing. My advice is to have them develop and put it on a CD, and make a special note to NOT cut the film into strips. Don’t ask them for prints. Later, you can split the half frame images apart using cropping software. Make one copy of each digital image, and then crop the left side from one copy and the right side from the other copy. You can then save to a CD/Card/flash drive and get it printed like any other digital image. I use Walmart’s one hour service and they do a great job, costs $4.23 and beats sending it a specialty processor out of state.


Pen EE
Pen EE
Pen EE
Pen EE
Pen EE
Pen EE
Pen EE
Pen EE
Pen EE
Pen EE
Pen EE
Pen EE
Pen EE
Pen EE

Pen EE
Pen EE
Pen EE
Pen EE
Pen EE

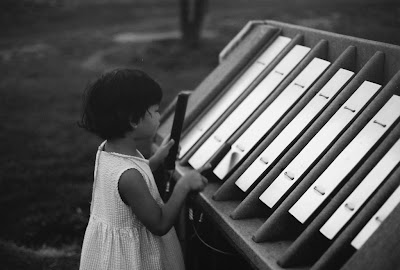
Photographed with an Olympus Pen EE (28mm f/3.5) on Fuji Super 100 film


Pen EE Camera #168426

Pen EE pictures photographed with a Panasonic Lumix DMC LC-20 2 megapixel digital camera


text and images © 2007 ajoy muralidhar. all names, websites, brands and technical data referenced are the copyright or trademark of their respective owners.
Add to Technorati Favorites

Early Spring and late Fall are my favorite times of the year for woodland photography. It isn’t because it’s cool and pleasant to be in the woods, but because there are no leaves on the trees then, and it’s the only times of the year that the forest floor gets enough light photograph the little critters, mushrooms and other fascinating organisms that live and die in the rich ecosystem of the forest floor.

In spring, before the canopy greens out and cuts off the light, the typical eastern US woodland has lots of tiny flowering plants with exquisite blooms. These are so small that you’d need to use a macro lens to get a decent sized image and see the detail.

Once the dense overhead canopy fills out, the forest floor gets very little light, so there’s not much in the way of flowers, but there are bugs and beetles galore, strange fungi, lichens, molds, mushrooms everywhere. The problem is finding enough light to take the picture. I’ve used a regular flash in the past, but the effect was always weird and unnatural looking.

To use natural light, I needed fast film ISO 400 etc AND a longer exposure, which needs a tripod. That pretty much limits hand-held photography to taking pictures of rocks, rotting leaves and mushrooms. Little forest critters move pretty quickly, vanishing under leaves and twigs like magic.

A few months ago, I found a Yashica Dental Eye camera with a fixed 50mm f/4 macro lens and a built-in ring flash. It was in great condition except for some very minor traces of battery leak corrosion. I took a chance and made the purchase, with the intention of returning it if I could not get it to work.

I cleaned out the battery compartment with a cotton bud dipped in white vinegar, and that was all there was to it. The camera works fine now, and the 50mm f/4 macro lens is a 1:1. This was the original Dental eye camera based on a FX3 body, I think – the later Dental Eye cameras have the suffix Dental Eye II and Dental Eye III, and they have a 100mm Macro lens. Check out the Micro/Macro section for more information on the Dental Eye.

This is a GREAT camera for woodland photography, and the possibilities are endless. The built in ring flash is powered by a battery pack that is fixed on the bottom of the camera (looks like a motor drive, but it’s not). Most of the Yashica cameras from this era have crumbling leatherette covers.

Mine started off fine, but now it looks patchy in a few places. This is purely a cosmetic issue, and should not deter anyone from buying the camera, especially if you can get it in full working condition with case for less than $100. I guess I will be replacing the leatherette soon.

The ring flash provides an even natural looking light. I’d swear it was daylight if I didn’t know better. There is a small supplementary lamp within the flash to provide some light for focusing. I think I will be using this camera a lot. I ran off a roll in the nearby woods along side a small stream. I really didn’t go looking for subject matter, since I was just running a test roll. This camera is a keeper. Here are some of the pictures…


Yashica Dental Eye
Yashica Dental Eye
Yashica Dental Eye
Yashica Dental Eye
Yashica Dental Eye
Yashica Dental Eye
Yashica Dental Eye
Yashica Dental Eye

Yashica Dental Eye
Yashica Dental Eye
Yashica Dental Eye
Yashica Dental Eye
Yashica Dental Eye
Yashica Dental Eye
Yashica Dental Eye
Yashica Dental Eye
Yashica Dental Eye
Yashica Dental Eye
Yashica Dental Eye
Yashica Dental Eye
Yashica Dental Eye
Yashica Dental Eye

Photographed with a Yashica Dental Eye camera (fixed 50mm f/4 1:1 macro lens and Fuji Superia 200 film


text and images © 2007 ajoy muralidhar. all names, websites, brands and technical data referenced are the copyright or trademark of their respective owners.
Add to Technorati Favorites

I finally got this great old camera cleaned up and replaced the seals. I loaded it up with 100 speed film and went shooting. I even did some low light photography with the superfast 50mm f/1.4 lens opened up to f/2. The TL-Super is one of the under-appreciated classics, in my opinion. (Matt Denton thinks very highly of it too, so I am in good company).

This was a pre-Contax collaboration era genuine Yashica design with a M42 screw mount, and like all Yashicas, had lenses designed by Tomioka. At this point in time, (1966) Tominon was not yet a part of Yashica, and although they made all the Yashica lenses, Tomioka was still designing and manufacturing lenses on contract for others.

Tomioka was absorbed into Yashica in 1968, right before the Yashica-Zeiss partnering on the Contax. They changed everything, except the quality. They dropped the M42 mount and designed the C/Y mount. But this post is about the TL-Super, not Contax, so…

My TL-Super has a dead meter – I think there’s a bit of gunk stuck in there somewhere gumming up the works and until I work up enough courage to take the top off, I’ll have to manage using the Sunny 16 rule. The battery isn’t a problem, though – easily available SR44 1.5V alkaline – one the first cameras to use this now common battery. Considering that this camera is from April 1966, that’s surprising since everyone used mercury batteries back then.

Here’s a mix of shots under different lighting conditions around Montogomery County MD. I desaturated the pictures from the park (sunny at the Xylophone) because they were taken in very low light conditions, and I liked the black and white effect better than the dull grays in color.

I as particularly pleased with the pictures I took at Great falls, with the Kayaker battling the current – I watched him try several times, get close, and then lose to the river. The Potomoc is practically running dry by late summer, all rocks and hardly any water falls – but still beautiful.


Great Falls
Great Falls
Sunny
Sunny

River
River
River
Great Falls
Great Falls
Canal Boat – Charles Mercer
Sunny by the Canal
Sunny – very close, aperture wide open. Bokeh

Neighborhood Pond
Neighborhood Pond
Sunny – Germantown Park

Photographed with an Yashica TL-Super, 50mm f/1.4 lens, Fujicolor 100, Polarizer in sunlight. Sunny f/16 rule, f/11 at 1/125, f/5.6 at 1/125sec. Last 3 photographs were at f/2 at 1/125


text and images © 2007 ajoy muralidhar. all names, websites, brands and technical data referenced are the copyright or trademark of their respective owners.
Add to Technorati Favorites

The Honeywell Repronar 805A slide copier was made by the Heiland Division of Honeywell. The camera is an Asahi Pentax with fixed bellows lens 50mm f/4, mounted on a bellows rail with a rack and pinion mechanism for advancing the lens or the camera body. There’s more on the Honeywell Repronar in the Macro photography section.

Although the whole camera assembly is mounted on a vertical stand with the lens pointing down towards the stand base – there is a flash strobe built into the base for copying slides and such. Once upon a time, this was standard equipment for most professional labs and school photography departments.

These days, as schools and colleges close down their photography departments; I’ve been noticing these items come up on EBay and going pretty reasonably. This is a heavy beast, and the shipping will cost almost as much as the item itself.

The Repronar comes WITH the camera and lens, so what’s not to like? Also, the camera is a very early BLACK Pentax SLR without a prism. It comes with a waist-level viewfinder (actually, eye level, when the camera is mounted on the Repronar base.

The real beauty of this system is that it has a scale device attached to it which makes setting for different magnifications very easy – the magnification range is 1/2x, 2/3x 1x, 2x, 3x and 4x. Just set the required magnification, fine focus and fire away. Using the flash is simplicity itself. Turn on the flash switch in the base, make sure the camera sync cord is connected and fire. The camera assembly can also be dismounted from the base and used as a bellows mounted camera provided you can stabilize the system horizontally.

Although the system can be used for transparent and semi-transparent subjects (flower petals, insect wing details etc) with the built in flash, the Repronar really comes into its own as a Macro system if you can get enough external lighting to the mounting platform. The best way to do this is to take the whole thing outdoors and place it on a table in open (sky illumination or in sunny situation. Mornings are best. All that remains is to set the magnification and provide sufficient exposure.

The problem with macro photography with the bellows and small apertures is getting sufficient image forming light. High magnification coupled with a reasonable depth of field means using extended bellows lengths, and small apertures. I was using Fuji 100 film for greater resolution and set aperture for f/16 for maximal depth of field.

There’s no light meter or TTL metering on the Repronar, so I tried to use a chart and then tried to figure out the exposure factor to compensate for the reciprocity failure. Finally I went with common sense, and the Sunny f/16 rule. Sunny 16 rule says that for 100 ASA, I’d need a 1/125 second shutter speed at f/16. Allowing for the light loss, for 1x magnification, I figured doubling the time to 1/60 second would give me the correct exposure.

Since the Repronar is designed to always work with the Flash, I figured it probably syncs at 1/60th second fixed, so the exposure would be correct for 1x magnification at least. For magnification greater than 1x, I decided that I’d set the Pentax camera to B and guesstimate the exposure length. Since at 1x magnification, the fixed 1/60 sec at f/16 would be sufficient exposure, I used 2 seconds for the 2x, 3 seconds for 3x and 4 to 5 seconds for 4x magnification. The guesstimates turned out fine, as can be seen from the images. Next time, I may use a Weston 6 Exposure meter. Or maybe not.


Tulip Tree leaf, Leafminer Trail 1:1, Flash mode
Tulip Tree leaf, 1:1, Flash mode
Dogwood leaf, 1:1, Flash Mode
Dogwood leaf, reversed, 1:1, Flash Mode
Carpenter Bee Wing, 2:1 (2x on film), Flash Mode
Pin Oak Acorn, 2:1 (2x on film), 2 sec at f/16, Daylight
Cucumber Flower, 2:1, Low Flash Mode
Cucumber Flower, 1:1, Flash Mode
Cucumber Flower, 2:1, Flash Mode
Crushed Chili Pepper, 1:1 (1x on film), 1/60th sec at f/16, Daylight
Crushed Chili Pepper, 2:1 (2x on film) 2 sec at f/16, Daylight
Crushed Chili Pepper, 3:1 (3x on film), 3 sec at f/16, Daylight
Crushed Chili Pepper, 4:1 (4x on film) 4 sec at f/16, Daylight
US Quarter, 1:1 (1x on film)1/60th sec at f/16, Daylight
US Quarter, 2:1 (2x on film), 2 sec at f/16, Daylight
US Quarter, 3:1 (3x on film) 3 sec at f/16, Daylight
US Quarter, 4:1 (4x on film) 4 sec at f/16, Daylight
US Quarter, Obverse 3:1 (3x), 3 sec at f/16, Daylight
US Quarter, Obverse, 4:1 (4x) 4 sec at f/16, Daylight
Ghostly Chile Pepper flower, 1:1 (1x) 2 sec at f/16
Nasturtium flower, 1:1 (1x) 2 sec at f/16

Photographed with a Honeywell Repronar Asahi Pentax Camera, 50mm f/4 Bellows lens, Fuji 100 film at f/16. Exposures as indicated in captions. Flash mode photographs used the built in Repronar flash in the base of the unit. Morning light was used for daylight pictures.


text and images © 2007 ajoy muralidhar. all names, websites, brands and technical data referenced are the copyright or trademark of their respective owners.
Add to Technorati Favorites

Here are some additional pictures from the Fujicarex II camera. The office building and apartment block are in Alexandria, VA. The Orthodox church is the St. Peter and Paul Antiochan Church on River Road, Potomac MD. I used the 50mm f/1.9 interchangeable front element lens.


Fujicarex II- 50mm f/1.9

Fujicarex II- 50mm f/1.9
Fujicarex II- 50mm f/1.9, 1/125 at f/16
Fujicarex II- 50mm f/1.9, 1/125 at f/11 – slight over exposure

Photographed with a Fujicarex II camera, 50mm f/1.9 front element interchangeable lens, Fuji 100 film


text and images © 2007 ajoy muralidhar. all names, websites, brands and technical data referenced are the copyright or trademark of their respective owners.
Add to Technorati Favorites

Next Page »