Camera Maintenance


I finally got this great old camera cleaned up and replaced the seals. I loaded it up with 100 speed film and went shooting. I even did some low light photography with the superfast 50mm f/1.4 lens opened up to f/2. The TL-Super is one of the under-appreciated classics, in my opinion. (Matt Denton thinks very highly of it too, so I am in good company).

This was a pre-Contax collaboration era genuine Yashica design with a M42 screw mount, and like all Yashicas, had lenses designed by Tomioka. At this point in time, (1966) Tominon was not yet a part of Yashica, and although they made all the Yashica lenses, Tomioka was still designing and manufacturing lenses on contract for others.

Tomioka was absorbed into Yashica in 1968, right before the Yashica-Zeiss partnering on the Contax. They changed everything, except the quality. They dropped the M42 mount and designed the C/Y mount. But this post is about the TL-Super, not Contax, so…

My TL-Super has a dead meter – I think there’s a bit of gunk stuck in there somewhere gumming up the works and until I work up enough courage to take the top off, I’ll have to manage using the Sunny 16 rule. The battery isn’t a problem, though – easily available SR44 1.5V alkaline – one the first cameras to use this now common battery. Considering that this camera is from April 1966, that’s surprising since everyone used mercury batteries back then.

Here’s a mix of shots under different lighting conditions around Montogomery County MD. I desaturated the pictures from the park (sunny at the Xylophone) because they were taken in very low light conditions, and I liked the black and white effect better than the dull grays in color.

I as particularly pleased with the pictures I took at Great falls, with the Kayaker battling the current – I watched him try several times, get close, and then lose to the river. The Potomoc is practically running dry by late summer, all rocks and hardly any water falls – but still beautiful.


Great Falls
Great Falls
Sunny
Sunny

River
River
River
Great Falls
Great Falls
Canal Boat – Charles Mercer
Sunny by the Canal
Sunny – very close, aperture wide open. Bokeh

Neighborhood Pond
Neighborhood Pond
Sunny – Germantown Park

Photographed with an Yashica TL-Super, 50mm f/1.4 lens, Fujicolor 100, Polarizer in sunlight. Sunny f/16 rule, f/11 at 1/125, f/5.6 at 1/125sec. Last 3 photographs were at f/2 at 1/125


text and images © 2007 ajoy muralidhar. all names, websites, brands and technical data referenced are the copyright or trademark of their respective owners.
Add to Technorati Favorites

The Honeywell Repronar 805A slide copier was made by the Heiland Division of Honeywell. The camera is an Asahi Pentax with fixed bellows lens 50mm f/4, mounted on a bellows rail with a rack and pinion mechanism for advancing the lens or the camera body. There’s more on the Honeywell Repronar in the Macro photography section.

Although the whole camera assembly is mounted on a vertical stand with the lens pointing down towards the stand base – there is a flash strobe built into the base for copying slides and such. Once upon a time, this was standard equipment for most professional labs and school photography departments.

These days, as schools and colleges close down their photography departments; I’ve been noticing these items come up on EBay and going pretty reasonably. This is a heavy beast, and the shipping will cost almost as much as the item itself.

The Repronar comes WITH the camera and lens, so what’s not to like? Also, the camera is a very early BLACK Pentax SLR without a prism. It comes with a waist-level viewfinder (actually, eye level, when the camera is mounted on the Repronar base.

The real beauty of this system is that it has a scale device attached to it which makes setting for different magnifications very easy – the magnification range is 1/2x, 2/3x 1x, 2x, 3x and 4x. Just set the required magnification, fine focus and fire away. Using the flash is simplicity itself. Turn on the flash switch in the base, make sure the camera sync cord is connected and fire. The camera assembly can also be dismounted from the base and used as a bellows mounted camera provided you can stabilize the system horizontally.

Although the system can be used for transparent and semi-transparent subjects (flower petals, insect wing details etc) with the built in flash, the Repronar really comes into its own as a Macro system if you can get enough external lighting to the mounting platform. The best way to do this is to take the whole thing outdoors and place it on a table in open (sky illumination or in sunny situation. Mornings are best. All that remains is to set the magnification and provide sufficient exposure.

The problem with macro photography with the bellows and small apertures is getting sufficient image forming light. High magnification coupled with a reasonable depth of field means using extended bellows lengths, and small apertures. I was using Fuji 100 film for greater resolution and set aperture for f/16 for maximal depth of field.

There’s no light meter or TTL metering on the Repronar, so I tried to use a chart and then tried to figure out the exposure factor to compensate for the reciprocity failure. Finally I went with common sense, and the Sunny f/16 rule. Sunny 16 rule says that for 100 ASA, I’d need a 1/125 second shutter speed at f/16. Allowing for the light loss, for 1x magnification, I figured doubling the time to 1/60 second would give me the correct exposure.

Since the Repronar is designed to always work with the Flash, I figured it probably syncs at 1/60th second fixed, so the exposure would be correct for 1x magnification at least. For magnification greater than 1x, I decided that I’d set the Pentax camera to B and guesstimate the exposure length. Since at 1x magnification, the fixed 1/60 sec at f/16 would be sufficient exposure, I used 2 seconds for the 2x, 3 seconds for 3x and 4 to 5 seconds for 4x magnification. The guesstimates turned out fine, as can be seen from the images. Next time, I may use a Weston 6 Exposure meter. Or maybe not.


Tulip Tree leaf, Leafminer Trail 1:1, Flash mode
Tulip Tree leaf, 1:1, Flash mode
Dogwood leaf, 1:1, Flash Mode
Dogwood leaf, reversed, 1:1, Flash Mode
Carpenter Bee Wing, 2:1 (2x on film), Flash Mode
Pin Oak Acorn, 2:1 (2x on film), 2 sec at f/16, Daylight
Cucumber Flower, 2:1, Low Flash Mode
Cucumber Flower, 1:1, Flash Mode
Cucumber Flower, 2:1, Flash Mode
Crushed Chili Pepper, 1:1 (1x on film), 1/60th sec at f/16, Daylight
Crushed Chili Pepper, 2:1 (2x on film) 2 sec at f/16, Daylight
Crushed Chili Pepper, 3:1 (3x on film), 3 sec at f/16, Daylight
Crushed Chili Pepper, 4:1 (4x on film) 4 sec at f/16, Daylight
US Quarter, 1:1 (1x on film)1/60th sec at f/16, Daylight
US Quarter, 2:1 (2x on film), 2 sec at f/16, Daylight
US Quarter, 3:1 (3x on film) 3 sec at f/16, Daylight
US Quarter, 4:1 (4x on film) 4 sec at f/16, Daylight
US Quarter, Obverse 3:1 (3x), 3 sec at f/16, Daylight
US Quarter, Obverse, 4:1 (4x) 4 sec at f/16, Daylight
Ghostly Chile Pepper flower, 1:1 (1x) 2 sec at f/16
Nasturtium flower, 1:1 (1x) 2 sec at f/16

Photographed with a Honeywell Repronar Asahi Pentax Camera, 50mm f/4 Bellows lens, Fuji 100 film at f/16. Exposures as indicated in captions. Flash mode photographs used the built in Repronar flash in the base of the unit. Morning light was used for daylight pictures.


text and images © 2007 ajoy muralidhar. all names, websites, brands and technical data referenced are the copyright or trademark of their respective owners.
Add to Technorati Favorites

Here are some additional pictures from the Fujicarex II camera. The office building and apartment block are in Alexandria, VA. The Orthodox church is the St. Peter and Paul Antiochan Church on River Road, Potomac MD. I used the 50mm f/1.9 interchangeable front element lens.


Fujicarex II- 50mm f/1.9

Fujicarex II- 50mm f/1.9
Fujicarex II- 50mm f/1.9, 1/125 at f/16
Fujicarex II- 50mm f/1.9, 1/125 at f/11 – slight over exposure

Photographed with a Fujicarex II camera, 50mm f/1.9 front element interchangeable lens, Fuji 100 film


text and images © 2007 ajoy muralidhar. all names, websites, brands and technical data referenced are the copyright or trademark of their respective owners.
Add to Technorati Favorites

McDaniel college in Westminster, MD – thats where the Raven’s have their training camp in the summer. Its a nice little campus, old buildings, Ivy league look and education, without the costs. The buildings are captivating at any time, but especially late in the evening when the old red bricks glow from the setting sun.

I have photographed these buildings several times – in color and black and white. This time, I was testing a vintage Fujicarex II that I’ve been cleaning and restoring. This has the most amazing selenium cell, no batteries needed, and the meter was spot on after all these years. I cleaned it up, and put in some seals as well.

This is an unusual camera from the early sixties – 1963, I think. This is one of the few SLRs that were made with an interchangeable FRONT element. The back element was fixed, and the front element changed as needed. Due to fixed real element, only a few focal lengths were possible a 35mm, 50mm and 80mm.

Only Fuji, Canon and Kodak ever introduced this type of camera, and they never caught on. I’ll have a more complete description of this camera and some pictures in the Classics section soon. I was lucky enough to find one in great condition, with all the 3 lenses. In these pictures, I used the 50mm f/1.9 element and the 35mm f/3.5 element.

Fujicarex II, 50mm f/1.9

Fujicarex II, 35mm f/3.5
Fujicarex II, 50mm f/1.9

Photographed with a Fujicarex II camera, 50mm f/1.9 front element interchangeable lens, Fuji 100 film


copyright 2007 ajoy muralidhar. all names, websites and brands referenced are the copyright or trademark of their respective owners.
Add to Technorati Favorites

The OM-1 is a totally mechanical camera – it does have a light meter, but the use of that is up to you, you can keep it turned off if you wish. The meter takes a 1.35v mercury cell anyway, which is impossible to get since they are banned all over the world. Although you can use a 1.5 volt silver oxide cell, it does require compensation since the incorrect voltage gives a reading that is a full f stop off, if not more.

Some owners have taken the drastic step of having their meters re-calibrated for the newer batteries, but there are very few OM camera technicians around who can do a good job. Who needs more scratches on the camera anyway? Besides, you might not want to spend the extra $$. It probably costs more than what you paid for the camera in the first place. However, if you do want to take the plunge, I’ve heard the folks at Zuiko.com and Camtech do a great job.

More often than not, the meters on these old gems are flaky anyway, since the light sensing selenium cells are shot. So, I thought I would try using the old Sunny 16 rule with one of the OM’s to see what kind of pictures would result. Besides, from the early days, photographers had been using “guesstimates” for their exposures, before light meters came along and made our lives easier. But it also made us dependent upon the technology. So much so that all the later OM cameras will not even work without batteries. Not so the venerable OM-1. It works just fine at all shutter speeds. No batteries needed. It even has a mirror lock-up to avoid the noisy mirror slap of most SLRs.

Pre-lightmeter photography gurus had worked out the Sunny 16 rule over the years, and it is simplicity itself. In essence -You have a manual camera which can operate without a light meter, such as an OM-1 – maybe the meter has flaked out when you are in the field, or your battery has run down, or whatever. No need to panic. This is how it works.

We need to do 2 things – figure out a workable shutter speed, and figure out a aperture opening (f/stop) for the light conditions we are working under.

1. You know the speed of the film you are using. Let us assume it’s 200 ASA.
2. Set the shutter speed as 1/film speed (as near as possible, so don’t worry) – since there is no 1/200 sec setting on the OM-1, we will set shutter speed as 1/250 sec.
3. Now for the light conditions – look at the table, and decide what kind of light we are working with.
4. Set aperture suggested for the light conditions – f/16 for bright and sunny etc.
5. Adjust for subject (open up 1/2 stop or stop down 1/2 stop as you think fit – Its easier to just bracket the shot. Take one at the suggested setting, then take 2 more at 1/2 stop increment or decrement on either side)
6. Shoot away. Keep your eye on the light conditions – if it changes, adjust aperture accordingly.

I have been experimenting a bit, and the following table works for me, since I use 200 ASA film most of the time. I strongly advise that everyone should play around with their equipment settings until they figure out what works best with their particular camera, and of course, their preferences for image contrast and exposure. Besides, modern photographers have another thing in their favor… modern 35 mm film. The advanced film emulsions available to us today are very forgiving – medium speed films have a range of up to 4 stops, which is enormous, considering that with the Sunny 16 rule, you will be off by at most 1/2 stop or so under or over exposed.

Retro-photography – doing what the old timers did before fancy exposure meters were available.

Set this Lens Opening for this Light Level when Shadow Type is
and Film Speed with Shutter speed at
f/22 Bright Sun, Snow, Concrete etc well defined 200 ASA ~1/250
f/16 Bright Sun, flat light dark, well defined 200 ASA ~1/250
f/16 Sunny, some clouds (flat light) well defined 200 ASA ~1/250
f/11 Slight Overcast (slightly bluish) Soft around edges 200 ASA ~1/250
f/11 Medium Overcast (bluish cast) Poorly defined 200 ASA ~1/250
f/8 Overcast (blue cast) Barely visible 200 ASA ~1/250
f/5.6 Heavy Overcast (blue cast) No shadow 200 ASA ~1/250
f/4 Sunrise/Sunset (reddish yellow cast) Long Shadows, raking light 200 ASA ~1/250

If you’re planning on using filters, make sure that you compensate aperture settings accordingly – Remember, there are no hard rules about filters – its always to your taste, so go with what pleases YOU. Lots of people LIKE the reddish-yellow cast of early morning and late evening light. If you’re one of them, trying using a Warming filter during sunrise/sunset, or for really spectacular red highlights, try a 85B filter. It’ll knock your socks off :).

Here is the Sunny 16 table with suggested filters and aperture settings compensated for the particular filters suggested for color or black & white.

Light Level Suggested Filter for color film
Suggested Filter  for B & W film
Compensated Aperture
Bright Sun, Snow, Concrete etc Circular Polarizer for color saturation/also cuts reflected light Yellow or Green f/11-f/16
Bright Sun, flat light Circular Polarizer for color saturation Yellow or Green f/8-f/11
Sunny, some clouds, (flat light) Circular Polarizer for color saturation Deep Yellow, Orange or Red f/8-f/11
Slight Overcast, Hazy Warming Filter 81A to compensate for bluish cast Yellow or Orange f/8
Medium Overcast (bluish cast) Warming Filter 81A/812 to compensate for blue cast Yellow f/8
Overcast (blue cast) Warming Filter 81A/812 to compensate for blue cast No filter needed f/5.6-f/8
Heavy Overcast (blue cast) Warming Filter 81A/812 to compensate for blue cast No filter needed f/4-f/5.6
Sunrise/Sunset (reddish yellow cast) Blue Filter 80B to compensate for reddish yellow cast; 85B filter for enhanced reds. No filter needed, use Orange or Red filter for special effects to darken sky f/2.8-f/4

Note -This table works for me with normal Daylight color film. Panchromatic black & white film does not have as wide a latitude as color film does so you’ll have to be a little more careful. In any case, I’d advise that all important shots be bracketed by 1/2 stop just to be on the safe side.

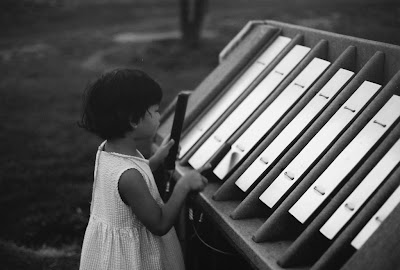
Here are some examples – I used a Zuiko 50mm f/1.8 lens with Fuji Xtra 200 film. Aperture and shutter settings are according to the table above.

Sunny conditions, 50mm, 1/250 sec, f/16
Light Overcast conditions, 50mm, 1/250 sec, f/11
Medium Overcast conditions. 50mm, 1/250 sec, f/8
Overcast conditions, 50mm, 1/250 sec, f/5.6

text and images © 2007 ajoy muralidhar. all names, websites, brands and technical data referenced are the copyright or trademark of their respective owners.
Add to Technorati Favorites

Now that wintry conditions are finally here, and we seem to be getting some snow every other day, I look out the window at the ‘winter wonderland’ snowscapes and want to grab a camera and rush outside. Then I remember all the precautions I need to take, and my enthusiasm is dampened a bit… but when I do get out, I’ve found that a remembering a few important things will ensure a higher percentage of usable shots.

Snowy/Cold conditions present some interesting challenges for any kind of photography. Never mind the fact that I’m usually freezing and so loaded down with winter garments that its difficult to move and manipulate the camera and lens controls. Before we even get to the problems of photography, lets talk about the environmental stuff – keeping the camera warm and dry. The winter jackets make this a little easier – best to keep the camera under the jacket until you need to use it, and of course, you can carry an extra lens and stuff in the large pockets. But be very very careful if you are going to change lenses. Make sure you don’t let any snow or water get into the body. I prefer a short-range zoom, say 28-80mm or 35-105mm with a hood!! in the first place so that I don’t have to change the lens. Or you can stick to the faithful 50mm. Filtering is another matter – we’ll come to that. And film… but first things first.

First of all, there is the problem of light – if it is sunny, the reflected light off the snowscape makes the scene so bright that the meter indicates a much shorter exposure than is actually needed – resulting in underexposed/dark and dingy subjects. Compensating for the subject (people and objects) may render the rest of the scene overexposed, washed out and featureless. Also, if we use a faster film, the brightness may cause the metering to go out of range.

A polarizing filter or a neutral density filter is essential to cut the light level to usable levels. The polarizer is the best bet, since it not only cuts reflections, but acts as a 2x neutral density filter AND helps saturate colors. If photographing in shaded conditions (sun behind cloud, open shade of buildings etc) remember that snow will tend to have a bluish cast, rendering the whole picture blue even if you have correctly compensated for the lower light conditions. In such a situation the polarizer/ND filter will need to be exchanged for a warming filter such as 81A or a Tiffen 812.

Which brings us to film – I recommend a slower film – 100 ASA for sunny conditions, and 200 ASA if photographing in sun/shade conditions, where you might have to use a fill flash, or use a slightly longer exposure. Don’t pick a faster film like 400 ASA or above unless you are using a longer zoom such as a 80-200mm which may have a smaller aperture (f/4.5-f/5.6) In such a case, if you are using a polarizer, you will need the faster film to compensate for the loss of 2 stops. It’ll be fine in sunny conditions.

One thing I learned about winter photography – going back inside into a warm room is BAD. The moisture will condense on the cold camera body and lens and even inside the camera and on the film. In short, everywhere since we are talking about old metal bodied manual cameras. I am not sure what it does to modern plastic bodied cameras, but you can be sure the condensation does not do the circuitry any good either.

Your best bet is to take along a few zip lock bags (at least one 1 gallon zip lock to take camera body with lens attached) and 1 inch wide coarse paintbrush when you go out. Before coming back in, brush off any snow that might be on the camera and lenses and then place the camera and lens and film canisters (exposed and unexposed) into the bag, and close them tightly, expelling as much air as possible in the process. When you come back inside, the moisture will condense ON the bags instead of your precious camera equipment. Do not take the camera out of the bags until it has reached room temperature – this won’t take too long, so be patient.

What about the poor photographer?? I cannot stress the importance of good, waterproof boots. They don’t have to be expensive – Walmart has excellent Herman Survivors waterproof leather boots for less than $40. Add thick warm cotton socks, and you are in business. Jeans don’t keep you warm when wet – the weave doesn’t keep wind out either. I suggest a under-layer of thermals, or if you have baggy jeans, wear a pair of sweat pants under them. Protect your upper body with at least 3 layers, a warm cap and don’t bother with goggles/glasses unless you really need them. A headband will prevent the cold metal of your camera from sticking to skin and causing a painful skin tear.

Thinsulate or fleece gloves are nice, but will be a huge hindrance when using the camera. You will be all thumbs. A better solution is the heatpacks that get activated when exposed to air – they warm up from 55-120 degrees F, and it’s great to have one in each pocket, since metal camera bodies and lens barrels can get cold. Open the packages up a few minutes before you go out and place one in each pocket. You can warm your hands by slipping them into a pocket and grasping them for a minute or two. They last about 12 hours, and you can reuse them. Just put them in a airtight zip lock bag, and they will stop heating when they run out of air. Don’t leave them against your skin for too long. They can cause mild burns. The instructions on the packets are usually clear. I’d advise you pick up a few and keep them in your car for emergencies.

Remember that you cannot concentrate on the best viewpoints, composition or accurate focusing when you are feeling wet, cold and miserable. It’s best to keep yourself as warm and safe as possible and protect your equipment as well as you can. I learned this the hard way 🙂 .


text and images © 2007 ajoy muralidhar. all names, websites, brands and technical data referenced are the copyright or trademark of their respective owners.